Data exfiltration is a tactic that allows cyber attackers to steal sensitive data and extract it outside of the organization. The MITRE ATT&CK framework defines nine different techniques and eight sub-techniques used by cyber attackers for illegitimately exfiltrating data.
In most cases, data exfiltration is used by InfoStealers, banking trojans, spyware, or as part of a ransomware approach known as double extortion.
The most common and hardest to detect means of exfiltrating data is implemented using known (or less known) cloud file sync services like Google Drive and SmartFile – as well as similar open-source services like FreeFileSync. It is also popular to use all-in-one sync tools like Rloader or Cyberduck – which have the built-in ability to work with nearly all file sync services. In this way, attackers can sync all relevant folders to accounts that they have access to.
The other two primary means of exfiltration in cyber attacks are via physical devices – which are easy to protect against by disabling the USB storage ability of endpoints; and using custom-built exfiltration tools – which is the approach we are going to talk about in this blog.
In some cases, even very simple approaches to data exfiltration can be well hidden using simple techniques. To learn more about this, see our recent blog, The Hidden Threats of PUPs.
The MITRE ATT&CK framework defines nine different techniques and eight sub-techniques used by cyber attackers for illegitimately exfiltrating data.
The Sender
Recently, Ransomware gangs have started to use custom-built exfiltration tools more often in their cyber attacks. One of these tools is the rebranded BlackMatter exfiltration tool originally used by the BlackMatter gang, and now also by the BlackCat (aka ALPHV) ransomware threat actor. Way back in November, it was reported that it was shut down due to law enforcement pressure. The following sections provide a deep-dive into the code of the rebranded BlackMatter exfiltration tool, which is both interesting and simple.
Ransomware gangs started to use custom-built exfiltration tools more often in their cyber attacks. One of these tools is the rebranded BlackMatter exfiltration tool
General info:
- MD5: 0a76e0e59456d310419266270c410936
- Type: PE32
Metadata:
- Copyright: 2021
- Product: sender2
- Description: sender2
- Original Name: sender2.exe
- File Version: 1.0.0.0
- Compilation workspace/artifact: C:workfile_sendersender2sender2binReleasesender2.pdb
- Compilation date: 2022:02:02 23:39:17+00:00
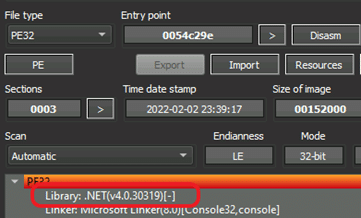
The executable is written in .Net.
BlackMatter Exfiltration Tool – using DetectItEasy
Behavior Analysis
The main goal of sender.exe is to collect all sensitive data and send it to the attacker before it has been encrypted by bundled ransomware.
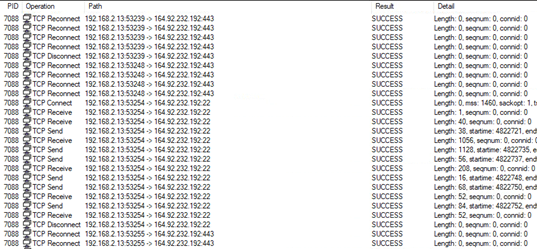
The main feature of this tool is a commonly known as the BlackMatter exfiltration tool with some add-ons. Aside from this main feature, the executable has many useless loops and “sleep” periods to avoid detection and keep itself in a state of low-rate activity. All external connections attempts are done to the hardcoded IP 164.92.232[.]192 ports 22 and 443 (SSH and HTTPS).
Communication activity seen in ProcMon
The tool has two methods for exfiltration: SFTP and HTTPS using WebDAV. WebDAV stands for Web Distributed Authoring and Versioning, which is an extension of the HTTP protocol that allows clients to edit remote content. There is also an embedded option to use socks5 using a hardcoded internal IP (10.26.16[.]181) (This is described in detail in the next section.)
Code Analysis
Since it’s .NET, it is easy to reverse! So, let the fun begin.
First, let’s jump into the config section.
This image shows the SFTP user name and password. (Please do not attempt to connect!)
SFTP User Name and Password
Notice that we can see the above-mentioned WebDav extension functionality:
WebDav Extension Functionality
Now, we can go through the main functions and classes – in order to understand the execution flow.
FilesFinder Class
The FilesFinder class includes functions and helpers to search and build a queue that allows relevant files to be exfiltrated.
The FilesFinder function searches for all relevant files and desired files among all drives of the machine:

FilesFinder Function
FileFinder searches for files last modified during a specific period. Quickly jumping to the Main function of the exfiltration tool to check what time period is of interest: First, the tool searches for files modified in the last six months. (from 6 month back to the next 10 years – in fact, it’s just the last 6 months). Then, it attempts to search for files modified between 1 year and 6 years ago (see B, below) – an attempt that can never succeed.
Time Period of Last Modification of Files
There is a logical mistake in the second loop (B). The function expects to find files with the last modified date for the period between 12 and 6 months ago. In this way, it would cover the last year (together with the first loop). It is probably a developer’s mistake caused by the “Tab Bug” – an automatic code suggestion for Now.addYears(-6) – which should instead be Now.addMonths(-6)). The function attempts to search the files’ last modified date more than 12 months ago (FromPeriod) but lower than 6 years ago (ToPeriod), which is logically impossible. (Look at the Main, FilesFinder and FileChecker functions’ explanations in this post.)
Note: In some cases, when exfiltration is unsuccessful, the attacker may attempt to present old, leaked files as “stolen” files. Be aware that in case of using the BlackMatter tool (also known as the ExMatter tool), they attempt to exfiltrate only “fresh” files.
Use the following functionality:
- GetDrives – Check for all available storage drives on the system. This is part of the System.IO.DriveInfo:
GetDrives
- CheckDrive – Initiates another process, for actually processing the drive:
CheckDrive
- driveProcessor – is the function that calls the above-described procedures for each drive, including FixAccess:
driveProcessor
- FixAccess – changes the ownership of the files for NTAccount:
FixAccess
- Note that FixAccess is set to “true” by default in the config file:
- Set up the queue for uploading the files:
Setting Up the Queue
Now, we will dive a bit deeper into the specific properties of the “desired files.” The File Checker is responsible:
File Checker
Follow these steps:
- Get an array of all files.
- Don’t take System files, Temporary files and Directory files. This means that out of the commonly used attributes, only Read-Only, Hidden and Archive files are taken.
- The minimum file size should be more than 4 bytes (nearly everything).
Minimum File Size
4. Use only “goodExtension” files:

goodExtension file
5. Avoid badFileMasks:

badFileMasks
6. The file should be last modified in the requested period we mentioned above. (The first search was for the last six months; then the second loop is useless, due to a developer error.)
7. Initially, some folders are skipped when processing the drives (badPaths). When processing the drives directories, avoid “badPaths” and elevate permissions.
badPaths
Upload Class
Upload class is responsible for handling the connection and managing the upload of the files. The connection is done via the above-mentioned sftp, or it can use the local proxy if it fails to use the current IP more than three times:

Connection Function of the Upload Class
Attempt to use the local proxy socks5 forwarder via 10.26.16[.]181:
Local Socks5
The User and Password have already been mentioned in the config file. Usually when using such exfiltration methods, you can find the credentials in the config file for SFTP, Google Drive, or any other syncing service.
Build the upload files queue:
Upload Files Queue
And don’t forget to test your machine connection before starting the upload process. Use the “test” function to test the connection to the internet using duckduckgo[.]com (a hardcoded URL you can see during static analysis).

Testing the Connection
Building the Upload Files Queue

Upload from the File Location to sftp
In a few lines, the Upload does the following:
Upload
WebDav Class
An alternative way of uploading involving getting help from the WebDav http extension. We can see the base URL that just adds “data” as a destination to obtain the exfiltrated data:
WebDav Upload URL
Aside from this, there is nothing interesting in the WebDAV class – it’s a classic implementation.
You can see some utilities of the sender, including the execution of the hidden PowerShell to clean up evidence of exfiltration and the tool:

Utilities
The sender is logging nearly everything, where it is executed non-hidden:

Logging
Here is an example of the resulting errors and actions:
Example of Resulting Errors
Note that the main function also handled several execution flags, like “ShowWindow”:

ShowWindow
To Summarize – Leveraging Rebranded BlackMatter in Cyber Attacks
Looking with this level of detail at Blackmatter – or more specifically, at the rebrand of the BlackMatter tool, which is now used by the BlackCat ransomware gang – can help organizations detect cyber attacks more effectively. Understanding how BlackMatter works allows us to set up detection rules and identify illegitimate activities. For example, at CyberProof we have seen frequently how detection rules can identify major ownership changes for files across the machine.
Understanding how BlackMatter works allows us to set up detection rules and identify illegitimate activities.
Be careful to whitelist only the appropriate file syncing services. It is best to choose a single one to be used by the whole organization and block all others.
Setting up canary files or honeypot folders containing files that nobody should touch should help identify cyber attacks as well. It is better to have different modification time periods for these files, and to exclude these files from file sync services and AntiVirus scanning to avoid False Positives.
To hear more about detection and threat hunting for custom exfiltration tools, gain a greater understanding of BlackMatter, and protect your organization against ransomware double extortion, contact CyperProof’s cyber experts.


